
안녕하세요.
이번 포스팅에서는 Paging 라이브러리를 프로젝트에 직접 적용해보겠습니다.
프로젝트 및 코드는 안드로이드 코드랩에서 가져왔습니다.
Android Paging 기본사항 | Android Developers
Android Paging 기본사항 | Android Developers
이 Codelab에서는 목록을 표시하는 앱에 Paging 라이브러리를 통합합니다. Paging 라이브러리를 사용하면 로컬 저장소에서나 네트워크를 통해 대규모 데이터 세트의 데이터 페이지를 로드하고 표시
developer.android.com
기존 프로젝트의 문제점
수백 개 가량의 기사 목록을 표시하는 어플이 있습니다.
현재 프로젝트는 500개에 해당하는 기사 items를 정적으로 다 가져와서 표시합니다.
=> 이를 Paging을 사용해 페이지별로 가져와 표시해보겠습니다.
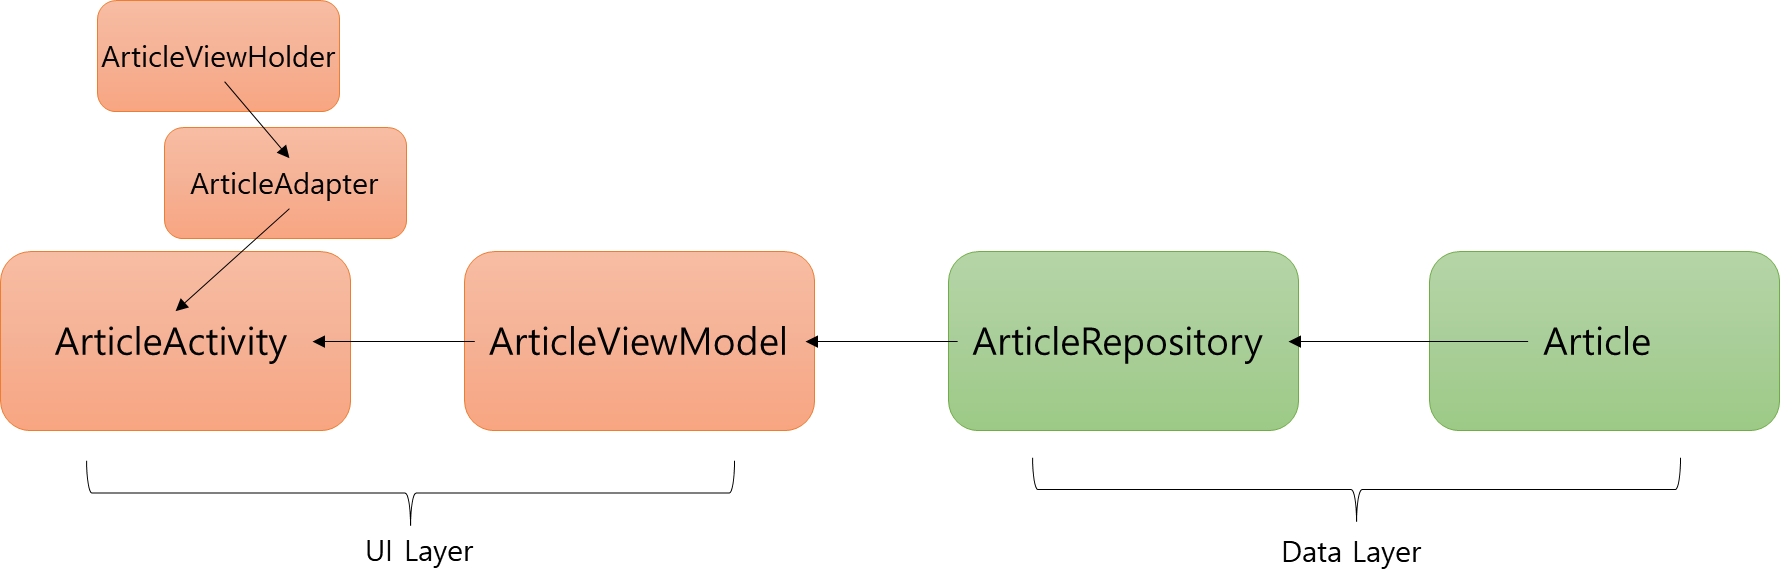
기존 프로젝트의 아키텍처
기존 프로젝트의 아키텍처는 MVVM 패턴을 따릅니다.
여기에 Paging에 필요한 클래스들을 넣어보겠습니다.
Gradle 설정
build.gradle(App 수준)
dependencies {
  ...

  implementation libs.androidx.paging.common.ktx
  implementation libs.androidx.paging.runtime.ktx
}
PagingSource
<Key, Value> 형태이고
override 해서 구현해야 하는 함수는 load와 getRefreshKey 함수 2개 입니다.
class ArticlePagingSource : PagingSource<Int, Article>() {

    override suspend fun load(params: LoadParams<Int>): LoadResult<Int, Article> {
        // If params.key is null, it is the first load, so we start loading with STARTING_KEY
        val startKey = params.key ?: STARTING_KEY

        // We fetch as many articles as hinted to by params.loadSize
        val range = startKey.until(startKey + params.loadSize)

        // Simulate a delay for loads adter the initial load
        if (startKey != STARTING_KEY) delay(LOAD_DELAY_MILLIS)
        return LoadResult.Page(
            data = range.map { number ->
                Article(
                    id = number,
                    title = "Article $number",
                    description = "This describes article $number",
                    created = firstArticleCreatedTime.minusDays(number.toLong())
                )
            },
            prevKey = when (startKey) {
                STARTING_KEY -> null
                else -> when (val prevKey = ensureValidKey(key = range.first - params.loadSize)) {
                    // We're at the start, there's nothing more to load
                    STARTING_KEY -> null
                    else -> prevKey
                }
            },
            nextKey = range.last + 1
        )
    }

    // The refresh key is used for the initial load of the next PagingSource, after invalidation
    override fun getRefreshKey(state: PagingState<Int, Article>): Int? {
        // In our case we grab the item closest to the anchor position
        // then return its id - (state.config.pageSize / 2) as a buffer
        val anchorPosition = state.anchorPosition ?: return null
        val article = state.closestItemToPosition(anchorPosition) ?: return null
        return ensureValidKey(key = article.id - (state.config.pageSize / 2))
    }

    /**
     * Makes sure the paging key is never less than [STARTING_KEY]
     */
    private fun ensureValidKey(key: Int) = max(STARTING_KEY, key)
}
Repository
사용자가 목록의 끝에 가까워지면 데이터를 요청합니다.
class ArticleRepository {
    fun articlePagingSource() = ArticlePagingSource()
}
ViewModel
페이징 데이터 스트림을 만들어줍니다.
Pager를 사용하여 데이터를 변환해줍니다.
PagingConfig로 PagingSource 구성 방법을 정의해줍니다.
(pageSize는 몇이고, placeHolder는 넣을 것인지 등등)
private const val ITEMS_PER_PAGE = 50

class ArticleViewModel(
    private val repository: ArticleRepository,
) : ViewModel() {

    val items: Flow<PagingData<Article>> = Pager(
        config = PagingConfig(pageSize = ITEMS_PER_PAGE, enablePlaceholders = false),
        pagingSourceFactory = { repository.articlePagingSource() }
    )
        .flow
        .cachedIn(viewModelScope)
}
Adapter
RecyclerView에 바인딩하기 위해 Adapter를 사용합니다.
class ArticleAdapter : PagingDataAdapter<Article, ArticleViewHolder>(ARTICLE_DIFF_CALLBACK) {

    override fun onCreateViewHolder(parent: ViewGroup, viewType: Int): ArticleViewHolder =
        ArticleViewHolder(
            ArticleViewholderBinding.inflate(
                LayoutInflater.from(parent.context),
                parent,
                false,
            )
        )

    override fun onBindViewHolder(holder: ArticleViewHolder, position: Int) {
        val tile = getItem(position)
        if (tile != null) {
            holder.bind(tile)
        }
    }

    companion object {
        private val ARTICLE_DIFF_CALLBACK = object : DiffUtil.ItemCallback<Article>() {
            override fun areItemsTheSame(oldItem: Article, newItem: Article): Boolean =
                oldItem.id == newItem.id

            override fun areContentsTheSame(oldItem: Article, newItem: Article): Boolean =
                oldItem == newItem
        }
    }
}
Activity
뷰 모델과 어댑터를 설정해줍니다.
class ArticleActivity : AppCompatActivity() {

    override fun onCreate(savedInstanceState: Bundle?) {
        super.onCreate(savedInstanceState)
        val binding = ActivityArticlesBinding.inflate(layoutInflater)
        val view = binding.root
        setContentView(view)

        // Get the view model
        val viewModel by viewModels<ArticleViewModel>(
            factoryProducer = { Injection.provideViewModelFactory(owner = this) }
        )

        val items = viewModel.items
        val articleAdapter = ArticleAdapter()

        binding.bindAdapter(articleAdapter = articleAdapter)

        // Collect from the PagingData Flow in the ViewModel, and submit it to the
        // PagingDataAdapter.
        lifecycleScope.launch {
            // We repeat on the STARTED lifecycle because an Activity may be PAUSED
            // but still visible on the screen, for example in a multi window app
            repeatOnLifecycle(Lifecycle.State.STARTED) {
                items.collectLatest {
                    articleAdapter.submitData(it)
                }
            }
        }

        // Use the CombinedLoadStates provided by the loadStateFlow on the ArticleAdapter to
        // show progress bars when more data is being fetched
        lifecycleScope.launch {
            repeatOnLifecycle(Lifecycle.State.STARTED) {
                articleAdapter.loadStateFlow.collect {
                    binding.prependProgress.isVisible = it.source.prepend is Loading
                    binding.appendProgress.isVisible = it.source.append is Loading
                }
            }
        }
    }
}

/**
 * Sets up the [RecyclerView] and binds [ArticleAdapter] to it
 */
private fun ActivityArticlesBinding.bindAdapter(articleAdapter: ArticleAdapter) {
    list.adapter = articleAdapter
    list.layoutManager = LinearLayoutManager(list.context)
    val decoration = DividerItemDecoration(list.context, DividerItemDecoration.VERTICAL)
    list.addItemDecoration(decoration)
}
결과
왼쪽 : paging 적용 전
오른쪽 : paging 적용 후
아래 하단 바를 보면, 일정 개수를 스크롤하면 로딩되는 것을 볼 수 있음


'Android Library' 카테고리의 다른 글
| [Android Library] Retrofit (2) - retrofit in MVVM (1) | 2023.11.22 |
|---|---|
| [Android Library] Retrofit (1) - 서버와 통신 (0) | 2023.11.16 |
| [Android Library] Paging (1) - 대규모 데이터 (0) | 2023.10.29 |
| [Android Library] Hilt (3) - hilt in MVVM (0) | 2023.10.18 |
| [Android Library] Hilt (2) - 기본 사용법 (2) | 2023.10.17 |


