
안녕하세요.
오늘은 try-catch block의 성능에 대해서 분석해보겠습니다.
필요성
Effective Kotlin의 item7 (결과 부족이 발생한 경우 null과 Failure를 사용하라) 에서 아래 구문을 확인했습니다.
try-catch 블록 내부에 코드를 배치하면, 컴파일러가 할 수 있는 최적화가 제한된다
실제로 얼마나 차이나는지 궁금해져서 테스트 해보게 되었습니다.
Microbenchmark
성능 분석을 위해 Android에서 제공하는 Microbenchmark를 사용했습니다.
https://developer.android.com/topic/performance/benchmarking/microbenchmark-write?hl=ko
Microbenchmark 작성 | App quality | Android Developers
이 페이지는 Cloud Translation API를 통해 번역되었습니다. Microbenchmark 작성 컬렉션을 사용해 정리하기 내 환경설정을 기준으로 콘텐츠를 저장하고 분류하세요. 애플리케이션 코드에 변경사항을 추
developer.android.com
위의 사이트 대로 진행한 뒤에 아래 내용을 추가하면 테스트가 정상 동작합니다.
dependencies 추가
내가 만든 module의 이름이 project() 내부에 들어가야 합니다.
androidTestImplementation(project(":microbenchmark"))
androidTest 하위 폴더에 코드 추가
테스트할 코드를 androidTest 하위 폴더에 집어넣어야 합니다.

SDK 35로 높이기
이렇게 하고 실행해보면 sdk 버전이 안맞는다고 에러가 뜹니다.
sdk 버전을 35로 높여줍니다
defaultConfig {
        applicationId = "com.example.benchmark"
        minSdk = 24
        targetSdk = 35

        ...
    }
휴대폰을 연결한 뒤에 실행해보면 아래와 같이 성공합니다.

테스트
테스트 대상 코드를 준비합니다.
- null 처리에 대해 null-safety를 사용한 코드
- NullException에 대한 try-catch를 사용한 코드
class CatchBenchmark {

    fun nonCatch(): Int {
        return calculateLengthSafely(1) + calculateLengthSafely(0)
    }

    fun catch(): Int {
        return try {
            calculateLengthUnsafely(1) + calculateLengthUnsafely(0)
        } catch (e: Exception) {
            0
        }
    }

    private fun calculateLengthSafely(number: Int): Int {
        return getString(number)?.length ?: 0
    }

    private fun calculateLengthUnsafely(number: Int): Int {
        val str = getString(number)
        return str!!.length
    }

    private fun getString(number: Int): String? {
        return if (number == 0) null else "Default"
    }
}
이 두 메서드를 Microbenchmark로 테스트 해보겠습니다.
import androidx.benchmark.junit4.BenchmarkRule
import androidx.benchmark.junit4.measureRepeated
import androidx.test.ext.junit.runners.AndroidJUnit4
import org.junit.Rule
import org.junit.Test
import org.junit.runner.RunWith

@RunWith(AndroidJUnit4::class)
class TryCatchBenchmark {

    @get:Rule
    val benchmarkRule = BenchmarkRule()

    private val catchBenchmark = CatchBenchmark()

    @Test
    fun benchmarkNonCatch() {
        benchmarkRule.measureRepeated {
            catchBenchmark.nonCatch()
        }
    }

    @Test
    fun benchmarkCatch() {
        benchmarkRule.measureRepeated {
            catchBenchmark.catch()
        }
    }
}
결과
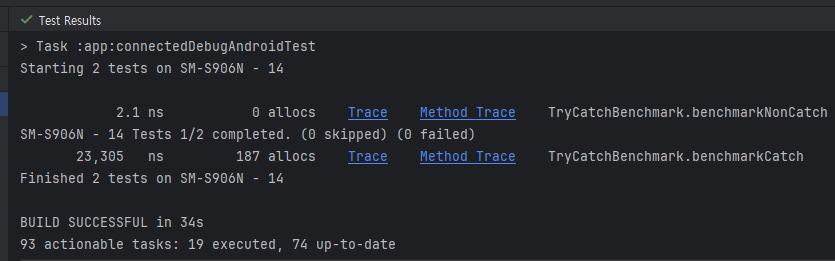
| Benchmark | Result | |
| null-safety | time | 2.1 ns |
| memory | 0 allocs | |
| try-catch | time | 23,305 ns |
| memory | 187 allocs | |
분석
try-catch를 사용한 코드가 시간, 메모리 관점에서 압도적으로 높게 나왔습니다.
- 23,305 ns → 해당 코드 블록의 실행이 평균적으로 23,305 ns 정도 걸린다는 의미
- 187 allocs → 187 번의 메모리 할당이 이루어졌다는 의미
왜 이렇게 많은 차이가 날까요?
위의 코틀린 코드를 bytecode로 한번 변환해 봅시다
public final class CatchBenchmark {
   public final int nonCatch() {
      return this.calculateLengthSafely(1) + this.calculateLengthSafely(0);
   }

   public final int catch() {
      int var1;
      try {
         var1 = this.calculateLengthUnsafely(1) + this.calculateLengthUnsafely(0);
      } catch (Exception var3) {
         var1 = 0;
      }

      return var1;
   }

   private final int calculateLengthSafely(int number) {
      String var2 = this.getString(number);
      int var10000;
      if (var2 != null) {
         int var3 = var2.length();
         var10000 = var3;
      } else {
         var10000 = 0;
      }

      return var10000;
   }

   private final int calculateLengthUnsafely(int number) {
      String str = this.getString(number);
      Intrinsics.checkNotNull(str);
      return str.length();
   }

   private final String getString(int number) {
      return number == 0 ? null : "Default";
   }
}
calculateLengthUnsafely 메서드를 보면 특이한 것이 하나 보입니다
private final int calculateLengthUnsafely(int number) {
   String str = this.getString(number);
   Intrinsics.checkNotNull(str);
   return str.length();
}
Intrinsics.checkNotNull() 메서드를 통해 null 처리를 합니다
이 함수를 자세히 보면, throwJavaNpe() 가 보입니다
public class Intrinsics {
    ...

    public static void checkNotNull(Object object) {
        if (object == null) {
            throwJavaNpe();
        }

    }
throwJavaNpe()도 보면, sanitizeStackTrace() 메서드가 보입니다.
public static void throwJavaNpe() {
    throw (NullPointerException)sanitizeStackTrace(new NullPointerException());
}
sanitizeStackTrace() 메서드를 보면, throwable.getStackTrace()가 보입니다.
private static <T extends Throwable> T sanitizeStackTrace(T throwable) {
    return sanitizeStackTrace(throwable, Intrinsics.class.getName());
}

static <T extends Throwable> T sanitizeStackTrace(T throwable, String classNameToDrop) {
    StackTraceElement[] stackTrace = throwable.getStackTrace();
    int size = stackTrace.length;
    int lastIntrinsic = -1;

    for(int i = 0; i < size; ++i) {
        if (classNameToDrop.equals(stackTrace[i].getClassName())) {
            lastIntrinsic = i;
        }
    }

    StackTraceElement[] newStackTrace = (StackTraceElement[])Arrays.copyOfRange(stackTrace, lastIntrinsic + 1, size);
    throwable.setStackTrace(newStackTrace);
    return throwable;
}
throwable.getStackTrace()를 확인하면, stackTrace를 만드는 것을 확인할 수 있습니다.
public StackTraceElement[] getStackTrace() {
    return (StackTraceElement[])this.getOurStackTrace().clone();
}

private synchronized StackTraceElement[] getOurStackTrace() {
    if (this.stackTrace == UNASSIGNED_STACK || this.stackTrace == null) {
        if (this.backtrace == null) {
            return UNASSIGNED_STACK;
        }
        this.stackTrace = StackTraceElement.of(this.backtrace, this.depth);
    }
    return this.stackTrace;
}
try block 안에서 null이 보이면, stackTrace를 만들어서 반환합니다.
그리고 특정 신호와 함께 catch block이 실행되는 것을 확인할 수 있습니다.
try-catch를 사용한 코드
예외 처리 비용
- try-catch 구문을 사용하면 예외가 발생할 때, 예외 처리를 위한 특정 클래스가 실행됩니다.
- (위에서 본 Intrinsics.class가 실행)
메모리 할당
- 예외를 처리하는데 필요한 객체나 스택 프레임 등의 메모리 할당이 추가적으로 발생합니다.
- (위에서 본 throwable.getStacktrace() 실행)
Null-Safety를 사용한 코드
Nullable 처리
- 조건문으로 간단히 처리할 수 있고,
- 추가적인 오버헤드가 발생하지 않습니다.
메모리 할당
- 예외 객체를 생성하지 않기 때문에 메모리 할당이 발생하지 않습니다.
여기까지 try-catch를 사용하고, 안하고의 차이를 알아봤습니다.
안전한 코드를 위해 try-catch는 반드시 필요한 코드입니다.
하지만, 간단한 if로 처리할 수 있는 코드에 try-catch를 넣는 건 낭비인 것 같습니다.
감사합니다.