
안녕하세요.
오늘은 Nuttx OS의 실습 환경을 갖추어 보겠습니다.
(WSL + Ubuntu 24.04.2 LTS 기준으로 작성했습니다.)
설치
필수 패키지 먼저 설치하겠습니다.
$ sudo apt update$ sudo apt install -y \
git \
cmake \
ninja-build \
build-essential \
kconfig-frontends \
genromfs \
libgmp-dev \
libmpc-dev \
libmpfr-dev \
gperf \
flex \
bison \
texinfo \
gawk \
automake \
autoconf \
libtool \
pkg-config \
g++ \
gcc-arm-none-eabi \
qemu-system-arm
소스 코드는 nuttx와 apps 두개를 받으면 됩니다.
$ mkdir nuttx_os
$ cd nuttx_os

$ git clone https://github.com/apache/nuttx.git
$ git clone https://github.com/apache/nuttx-apps.git apps
apps, nuttx 디렉토리가 생성되었는지 확인해줍니다.
$ ~/nuttx_os$ ls -al
total 16
drwxr-xr-x  4 kdr06006 kdr06006 4096 May 22 10:47 .
drwxr-x--- 19 kdr06006 kdr06006 4096 May 22 10:45 ..
drwxr-xr-x 35 kdr06006 kdr06006 4096 May 22 10:47 apps
drwxr-xr-x 26 kdr06006 kdr06006 4096 May 22 10:46 nuttx
실습 - QEMU ARM
configure을 먼저 활성화 해줍니다.
$ cd nuttx

$ ./tools/configure.sh qemu-armv7a:nsh
...
mkkconfig in /home/kdr06006/nuttx_os/apps/testing
mkkconfig in /home/kdr06006/nuttx_os/apps/videoutils
mkkconfig in /home/kdr06006/nuttx_os/apps/wireless/bluetooth
mkkconfig in /home/kdr06006/nuttx_os/apps/wireless/ieee802154
mkkconfig in /home/kdr06006/nuttx_os/apps/wireless
mkkconfig in /home/kdr06006/nuttx_os/apps
#
# configuration written to .config
#
그 다음 아래 명령어를 입력하면:
$ make menuconfig
이런 화면이 뜹니다.
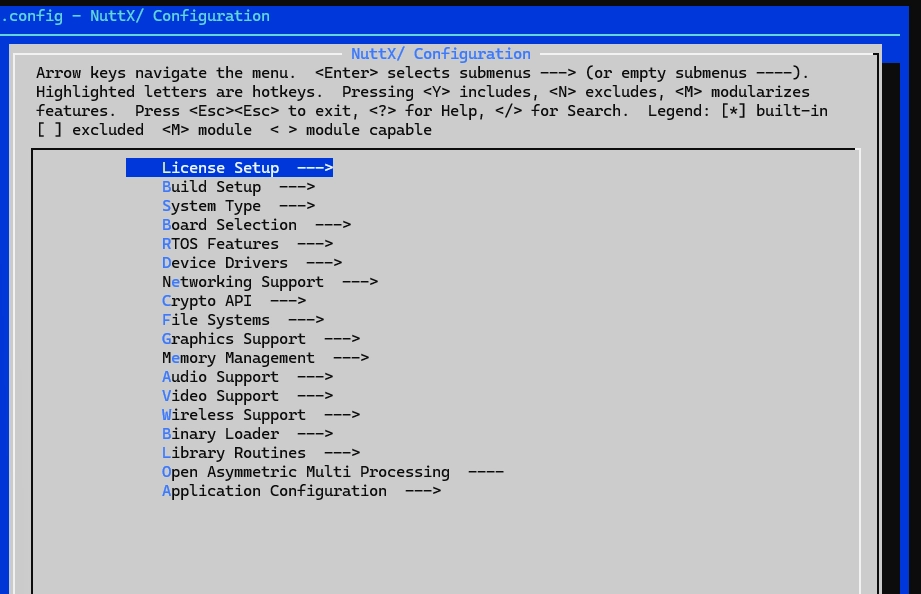
나중에 driver enable, stack size, debug, filesystem, network 등을 여기서 on / off 할 수 있습니다.
빌드
빌드하기 전, cxxfilt를 설치해야 하는데
wsl 환경에서 보안상의 이유로 막힙니다.
$ pip3 install --user pyelftools cxxfilt
error: externally-managed-environment

× This environment is externally managed
╰─> To install Python packages system-wide, try apt install
    python3-xyz, where xyz is the package you are trying to
    install.

    If you wish to install a non-Debian-packaged Python package,
    create a virtual environment using python3 -m venv path/to/venv.
    Then use path/to/venv/bin/python and path/to/venv/bin/pip. Make
    sure you have python3-full installed.

    If you wish to install a non-Debian packaged Python application,
    it may be easiest to use pipx install xyz, which will manage a
    virtual environment for you. Make sure you have pipx installed.

    See /usr/share/doc/python3.12/README.venv for more information.

note: If you believe this is a mistake, please contact your Python installation or OS distribution provider. You can override this, at the risk of breaking your Python installation or OS, by passing --break-system-packages.
hint: See PEP 668 for the detailed specification
이를 venv 가상 환경을 활성화해서 해결할 수 있습니다.
(대신 단점은 빌드할 때마다 venv 가상 환경을 띄워야 합니다.)
필요한거 설치
$ sudo apt install python3-venv python3-full

$ cd ~/nuttx_os
$ python3 -m venv .venv
그리고 해당 디렉토리를 확인해보면 .venv가 보입니다.
$ ~/nuttx_os$ ls -al
total 20
drwxr-xr-x  5 kdr06006 kdr06006 4096 May 22 10:58 .
drwxr-x--- 19 kdr06006 kdr06006 4096 May 22 10:45 ..
drwxr-xr-x  5 kdr06006 kdr06006 4096 May 22 10:58 .venv 📌
drwxr-xr-x 36 kdr06006 kdr06006 4096 May 22 10:53 apps
drwxr-xr-x 27 kdr06006 kdr06006 4096 May 22 10:53 nuttx
활성화 해주면:
$ source .venv/bin/activate
이제 shell 앞에 (.venv) 가 붙습니다.
이 후 cxxfilt를 다시 설치해보면, 문제없이 잘 설치 됩니다.
(.venv) :~/nuttx_os$ pip install pyelftools cxxfilt
Collecting pyelftools
  Downloading pyelftools-0.32-py3-none-any.whl.metadata (372 bytes)
Collecting cxxfilt
  Downloading cxxfilt-0.3.0-py2.py3-none-any.whl.metadata (3.5 kB)
Downloading pyelftools-0.32-py3-none-any.whl (188 kB)
   ━━━━━━━━━━━━━━━━━━━━━━━━━━━━━━━━━━━━━━━━ 188.5/188.5 kB 2.4 MB/s eta 0:00:00
Downloading cxxfilt-0.3.0-py2.py3-none-any.whl (4.6 kB)
Installing collected packages: pyelftools, cxxfilt
Successfully installed cxxfilt-0.3.0 pyelftools-0.32
빌드는 make -j$(nproc) 로 할 수 있습니다
(.venv) :~/nuttx_os/nuttx$ make -j$(nproc)
LD: nuttx
Memory region         Used Size  Region Size  %age Used
             ROM:      279712 B         1 MB     26.68%
             RAM:         16 KB        16 MB      0.10%
Memory region         Used Size  Region Size  %age Used
             ROM:      310848 B         1 MB     29.64%
             RAM:         28 KB        16 MB      0.17%
Memory region         Used Size  Region Size  %age Used
             ROM:      310848 B         1 MB     29.64%
             RAM:         28 KB        16 MB      0.17%
Memory region         Used Size  Region Size  %age Used
             ROM:      310848 B         1 MB     29.64%
             RAM:         28 KB        16 MB      0.17%
CP: nuttx.bin
빌드가 성공했다면, nuttx 바이너리가 생성된걸 볼 수 있습니다.
~/nuttx_os/nuttx$ ls -al | grep nuttx
lrwxrwxrwx  1 kdr06006 kdr06006      84 May 22 10:49 Make.defs -> /home/kdr06006/nuttx_os/nuttx/tools/../boards/arm/qemu/qemu-armv7a/scripts/Make.defs
-rwxr-xr-x  1 kdr06006 kdr06006 3864672 May 22 10:59 nuttx
-rwxr-xr-x  1 kdr06006 kdr06006  310848 May 22 10:59 nuttx.bin
-rw-r--r--  1 kdr06006 kdr06006      37 May 22 10:59 nuttx.manifest
-rw-r--r--  1 kdr06006 kdr06006 1880787 May 22 10:59 nuttx.map
실행
실행은 아래 커맨드로 할 수 있습니다.
$ qemu-system-arm \
-M virt \
-cpu cortex-a7 \
-nographic \
-kernel nuttx
성공하면 아래처럼 shell이 뜹니다
NuttShell (NSH) NuttX-12.13.0
nsh>
Test
간단한 것들을 확인 해보면:
task 목록
nsh> ps
  TID   PID  PPID PRI POLICY   TYPE    NPX STATE    EVENT     SIGMASK            STACK    USED FILLED COMMAND
    0     0     0   0 FIFO     Kthread   - Ready              0000000000000000 0004072 0000696  17.0%  Idle_Task
    1     0     0 192 RR       Kthread   - Waiting  Semaphore 0000000000000000 0004024 0000464  11.5%  hpwork 0x400029b8 0x40002a10
    3     3     0 100 RR       Task      - Running            0000000000000000 0004048 0001528  37.7%  nsh_main
메모리 확인
nsh> free
      total       used       free    maxused    maxfree  nused  nfree name
   16728060      12268   16715792      15104   16713328     27      2 Umem
디바이스 확인
nsh> ls /dev
/dev:
 console
 null
 ttyS1
 zero
mount 확인
nsh> mount
  /proc type procfs
  /tmp type tmpfs
hello command
nsh> hello
Hello, World!!
종료
os를 종료하고 싶으면 Ctrl + A를 누른 후, x를 누르면 됩니다.
nsh> QEMU: Terminated마무리
여기까지 Nuttx OS의 실습 환경 세팅에 대해 알아봤습니다.
Nuttx는 Real time OS로, 리눅스보다 OS가 가볍다는 특징이 있습니다.
Nuttx OS를 공부해보면서 os와 친밀해질 수 있길 기대해봅니다.
감사합니다.
'Nuttx OS' 카테고리의 다른 글
| [Nuttx OS] Scheduler (0) | 2026.06.03 |
|---|---|
| [Nuttx OS] Boot Sequence 분석 (0) | 2026.05.25 |
| [Nuttx OS] shell cmd 분석 및 추가해보기 (0) | 2026.05.23 |


